This is just one way to sew curtains with a lining. There are so many approaches, some undoubtedly better than mine! These are easy, effective… Pretty. The buttonholes in this version allow the fabric on the sides to fully wrap around the lining in the back. This way you don’t see the lining on the edges like you often do with the super-easy lined curtain option I mention below.
Curtain Basics
Easy, easy curtains
The easiest curtains are just hemmed (first the bottom, then the sides), with the top folded to the back and stitched to create a pocket for your curtain rod. You could make a full set in a half hour! Why work any harder? Well, sometimes you need a bit more from your curtains. Curtains with a lining panel help your windows look nice from the outside when the curtains are closed, provide more privacy, and they give the curtains a heft that makes them feel a bit more… Luxurious? Professional?
Only slightly more difficult than a basic curtain
For a super-easy lined curtain you can cut lining and outer panels to the same dimensions, hem the panel bottoms, then sew the remaining three sides together to create a sort-of pillow. You just need to leave holes on the top sides for the rod.
Linings
You can use a light-weight muslin for your lining, or you can easily purchase special lining fabrics. Some of these special fabrics really help to keep a room dark (nice for kiddos that rise with the sun!) and some have special insulating properties to block heat or coldness. I went for a natural, upholstery-weight cotton lining because my curtain fabric was fairly light (and see-through!).
Getting Started

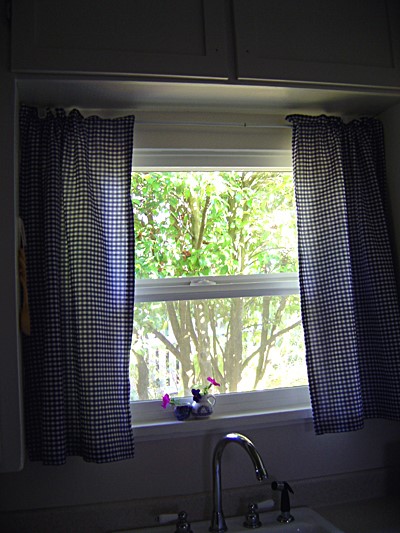
The set of curtains we’re making today is only slightly more difficult than the super-easy lined curtain option above, but it gives your curtains a nice, professional look. My kitchen really isn’t so sad, but I made it black & white to show a sharp contrast between the plain, still-settling-in look and the new curtain look! This is the “before.” Ready? We’re going to measure and cut all four panels, hem the bottoms, stitch the tops together, make buttonholes and pockets for the rod, hem the sides and ooh and aah.
Step One
Measure your window. A general curtain rule is that the more fabric you have in your curtain, the “fluffier” the curtains will look. One standard measurement is to make each panel almost- or as-wide as your window. You’ll then have two curtain panels that will still have lots of draping texture when closed.
Width Measurement
I tend to like a more flat look, so my cut curtain panel width was 3/4 of the window measurement. The only way you can go wrong here is to cut them so that once you hem the sides and close the curtains, the curtains don’t cover the window! For example: If your window is 2′ wide you might want to cut two lining panels, 2′ wide.
Height Measurement
Hold the fabric up (or, better yet, have someone else do it so you can stand back to look at the space) and decide the top to bottom height of your finished curtain panels. Add approximately 2″ to this measurement to accommodate a hem. For example: If you want your finished curtains to hang 3′ from top to bottom, cut your lining panels at 3′ 2″.
Step Two
Cut your lining panels. In our example above you would end up with two panels, each measuring 2′ x 3′ 2″. Fold and press up 3/4″ on the two bottom edges, then fold and press up 3/4″ again.
Step Three
Measure and cut your outer fabric. Take your lining measurement and add approximately 3″ to the width and 2″ to the height. This will give you some extra outer fabric in your final curtains so your lining never shows. In our example you’d have two lining panels 2′ 3″ x 3′ 5″.
Fold and press up 3/4″ on the two bottom edges, then fold and press up 3/4″ again. If you have a really obvious grid like I do with my gingham, be sure to do a visual check of the bottom fold from the front of the panel. Any wonkiness will really show on this bottom line.
Step Four
Hem the bottom folds on all four panels. You might consider trying a blind hem stitch for an “invisible” hem.
Step Five
Lay your lining panels down, nice side up. Place your outer panels, nice side down, matching the top edges but centering the lining panel within the outer curtain panel. The bottom of the outer panel should stick out a bit beyond the lining, and you should have about 1 1/2″ more outer panel fabric on either side of the lining fabric. Pin.
Step Six
Make sure you really do have right sides facing, then sew along the top with a 1/2″ seam allowance. Turn and press. Stitch again with a 1/4″ seam allowance to make this top edge really crisp.
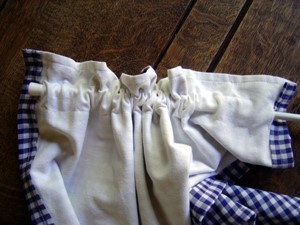
Measure approx. 1 1/4″ from this seam and stitch across the top of the panels again. This creates that top “frill” section.

Step Seven
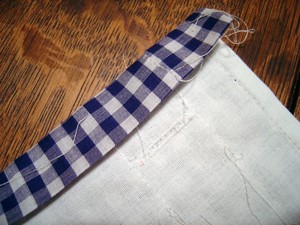
Fold and press your outer side panel seams over your lining panel in the back. To do this I made sure the lining was very straight, then I folded and pressed the outer fabric edge to the lining fabric edge. Then I folded and pressed this over, enclosing the lining edge with my outer fabric.
Step Eight
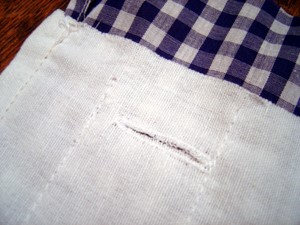
Make a buttonhole in the lining only, just inside the edge created by the outer fabric. The buttonhole starts at the line you just sewed approx. 1 1/2″ down from the top of your curtain, and extends down. Make your buttonhole big… I’d make it twice the height of your curtain rod. Repeat buttonholes so you have one at either top end of both panels (four total).
Step Nine
Sew along the top of each curtain again, creating a pocket for the rod. My buttonholes are a little under 1 1/2″. I sewed at 1/4″ down, 1 1/4″ down from that line (top o’ pocket) and 1 1/2″ from that line (bottom o’ pocket).
Step Ten
Pin the hem you pressed over the sides of your lining panels. Stitch.
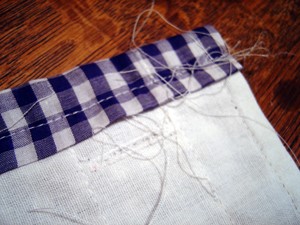
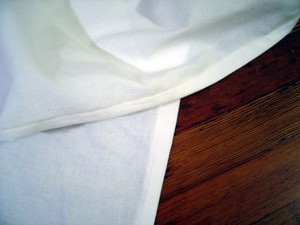
Trim your threads. That’s better! Your top four corners should look like this.

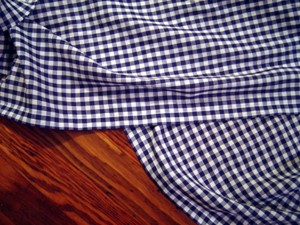
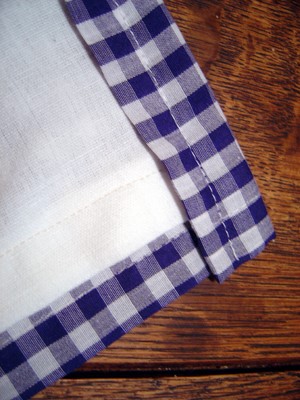
Your bottom corners look like this. Just a side note on why my stitches aren’t closer to the very edge of the fabric: I wanted to use white thread, and I wanted it to blend in so I had to be really aware of where the stitch was on the front of the panels. It looks not-quite-as-perfect from the back, but it’s still just fine and the room view is fantastic.
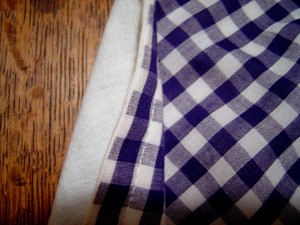
Here’s the view from the back with the rod threaded through the buttonholes and the rod pocket.
There’s the lining!