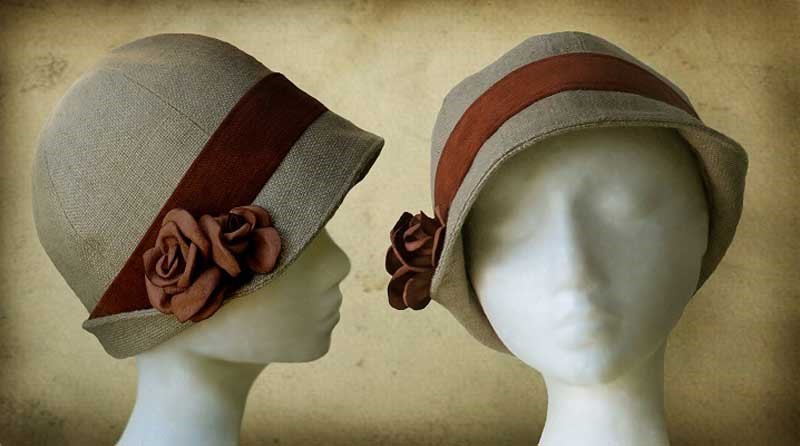
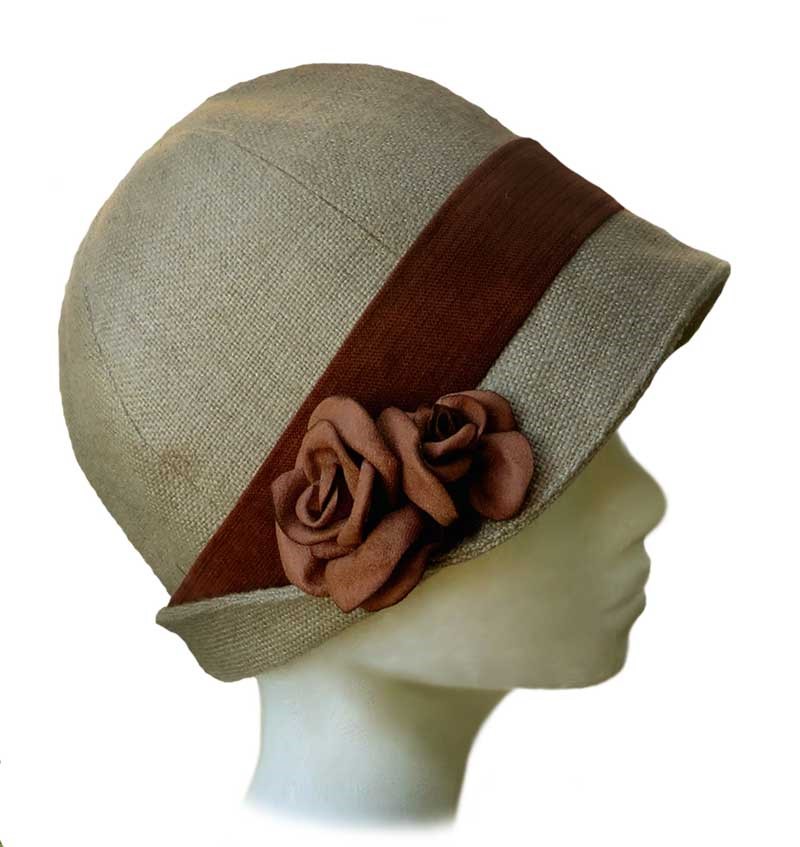
Wendy Talené is the designer behind Elsewhen, your source for hat patterns, hats or custom millinery requests. Wendy designed this pretty Rosabelle Cloche, an elegant hat with handmade roses for sizes 19” – 25” (Toddler – Adult Large). You can download the free PDF pattern and follow Wendy’s step-by-step instructions in her tutorial below! All of your friends will want their own Rosabelle.
Rosabelle Hat Free Pattern
Rosabelle is a simple and versatile cloche hat that can be made in any size for any season. The whole project can be completed in two hours. This pattern includes instructions for making your own handmade roses. Skip to the rose section to start your own bouquet, hairpiece or boutonniere, just in time for wedding season! For the full pattern with printable instructions.
Skill Level: Intermediate
This pattern has detailed explanations, illustrations and sewing tips that could make this pattern an enjoyable project even for a relative novice. However, you should be familiar with the capabilities of your sewing machine, like adjusting tension for thick and thin fabrics or using the appropriate needle for your selected fabric.
Finding Your Hat Size
To find your hat size, place a measuring tape around your head, just above your ear. Think about how thick your hair is and how you will likely arrange your hair when wearing this hat. Add ½”-1” to your head measurement for a comfortable fitting hat size. Note that, depending on the thickness of your fabric, the interior measurement of the hat is roughly 1″ smaller than the outer measurement, so the crown of the hat will be loose until the lining and head band are inserted. For example, head measurement: 22” = hat size: 23” = outside hat measurement: 24”.
Notions Required
- ½ yard of hat fabric
- ¼ yard of lining fabric
- Scraps of synthetic fabric for roses
- Thread to match hat fabric and binding
- 1-yard iron-on adhesive or fusible interfacing (optional)
- Candle or lighter
- Fabric stiffener (optional)
Recommended Fabrics
This hat can be made of a variety of fabric but it is ideal to use a fabric of medium thickness without any stretch in it. Thick faux suede works well. Other fabrics of thin to medium thickness or fabrics with loose weave or stretch can be stiffened or stabilized using the fusing techniques on Page 5 of the PDF. For the hat lining, fabrics like taffeta, satin or pre-washed cotton are best. For the roses, find fabric with meltable, synthetic fibers, such as polyester, nylon or spandex. For the hat shown, I used thin, polyester faux suede for a soft texture.
Rosabelle Hat Tutorial
Cutting Your Fabric
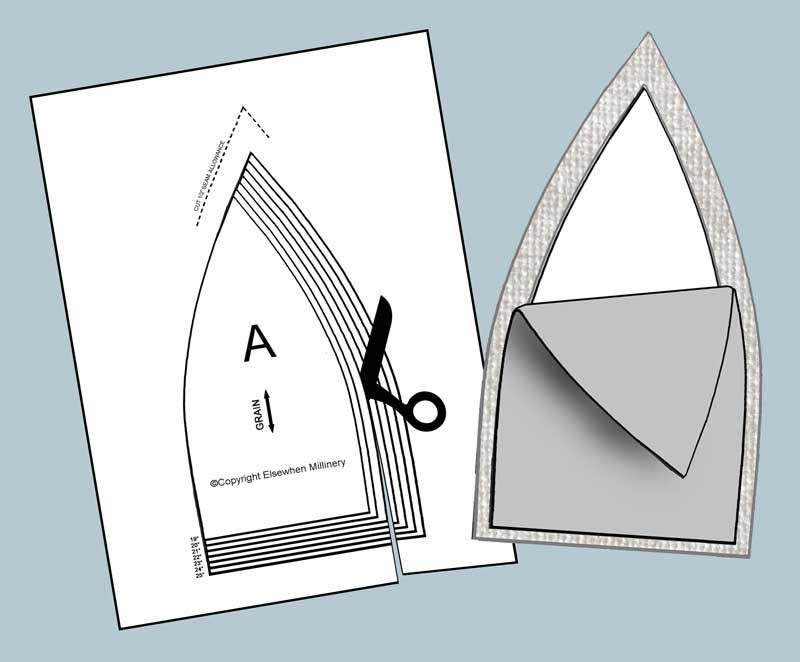
Many sewing patterns incorporate seam allowances into the pattern shape itself. However Elsewhen patterns do not, for several reasons. Most crucially, it allows for more accuracy to mark the precise sewing line and estimate the cut line than vice versa, especially when fitting a hat to a round head for an exact and comfortable fit as well as small details in design.
- Cut out the paper pattern piece on the solid line, according to your hat size (about 1” larger than your head measurement).
- Take a moment to decide which pattern pieces to cut out of which area of fabric so that you’ll have all the pieces you need with the grain in the right direction.
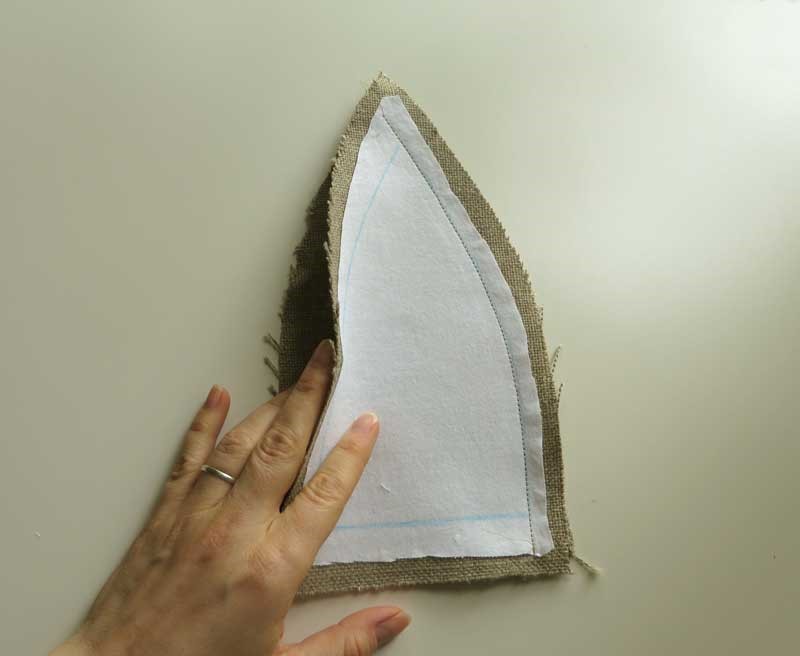
- Mark a sewing line on the back of the fabric around each pattern piece.
- Mark a cutting line ½” outside the sewing line. This is your seam allowance.
- Cut and iron each piece.
- Cut out iron-on adhesive and cotton fabric if needed and iron them on to the respective pieces.
Cut
- 6 of pattern A in hat fabric
- 6 of pattern A in lining fabric
- 2 of pattern B in hat fabric
- 1 piece of hat fabric 2” x 25” (This hat band can be substituted with grosgrain ribbon.)
Crown
- Determine your hat size (about 1” larger than your head measurement).
- Cut out six pieces of fabric of pattern A, following the direction of the grain specified on the pattern piece, and allowing ½” margins outside the edge of the pattern piece (this is your seam allowance).
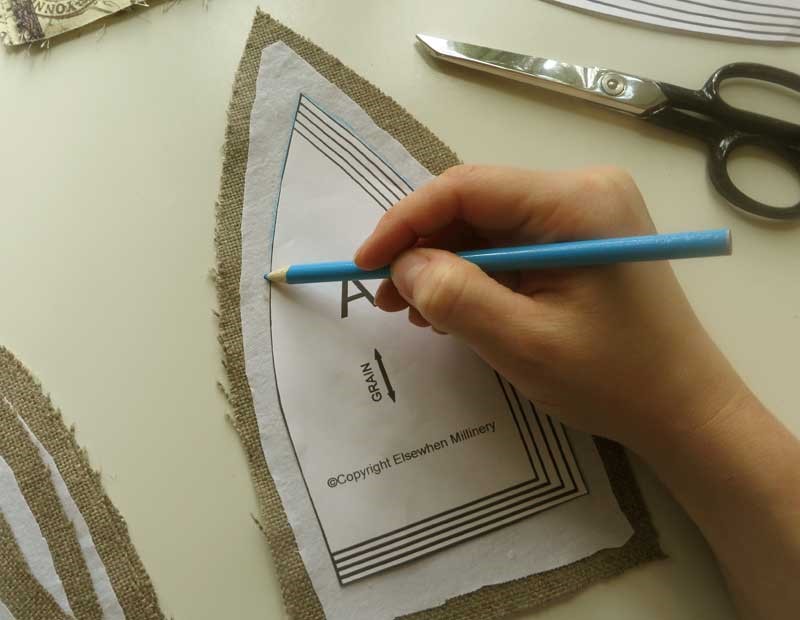
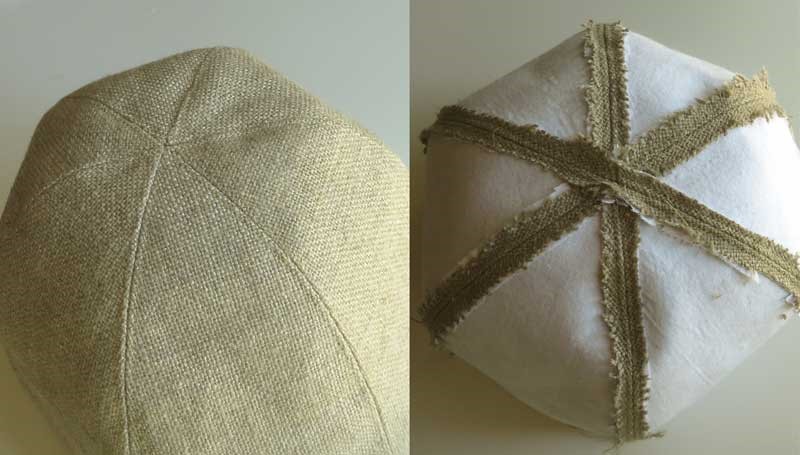
For the hat shown, I stabilized my loose weave linen/burlap fabric with iron-on adhesive and a thin layer of cotton. No more stretch and just the right thickness.
- Place the front sides of two A pieces together and sew along one curved edge ½” from the edge of the fabric.
- Fold the front sides open and with the unfinished edges folded to the left behind, place a third piece-A, front side down against the unfolded pieces. Sew along the curled edge’s right hand side.
- You now have three A pieces sewn together, forming a point at the top of the center piece.
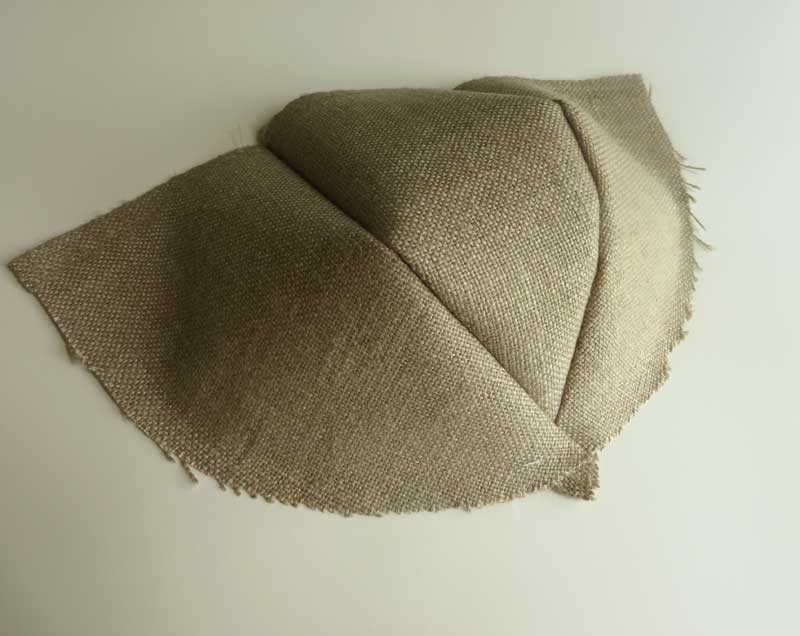
- Group this aside and sew the remaining three pieces into a second set of three.
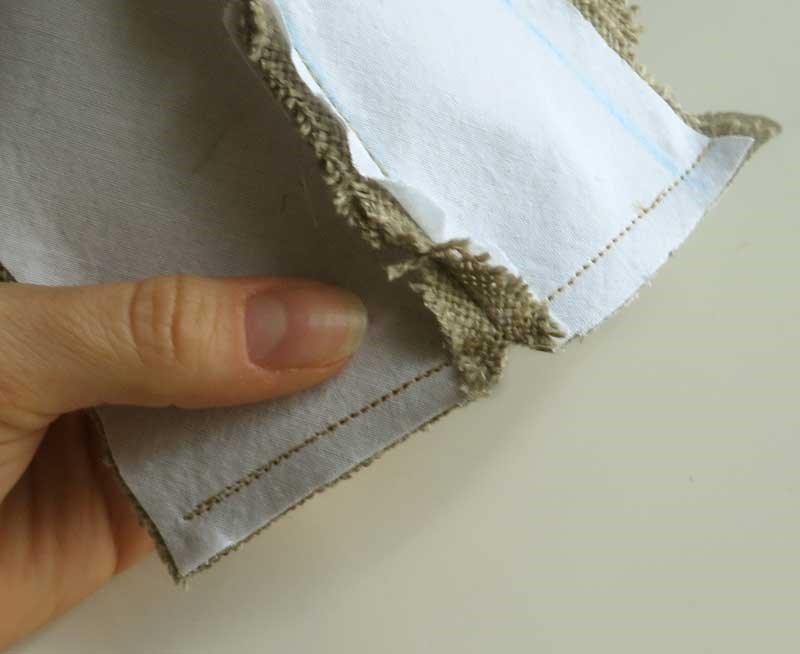
- For each set of three, turn over to the wrong side and sew a top-stitch 1/8” on either side of the two inner sewing lines, pressing the flaps outward.

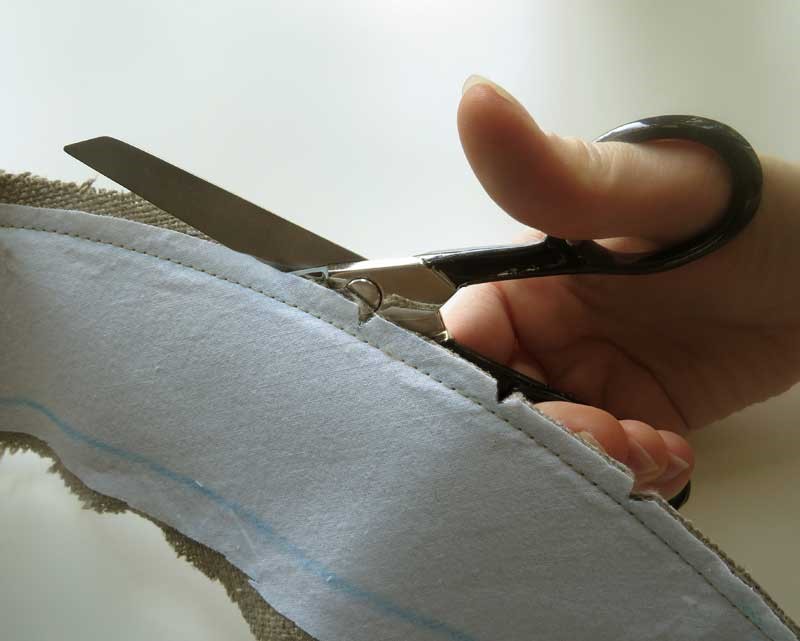
- Remove the excess fabric from the top-stitched flaps and cut it away.
- Precisely match the points at the top of the two sets of three. Use a pin if it helps.
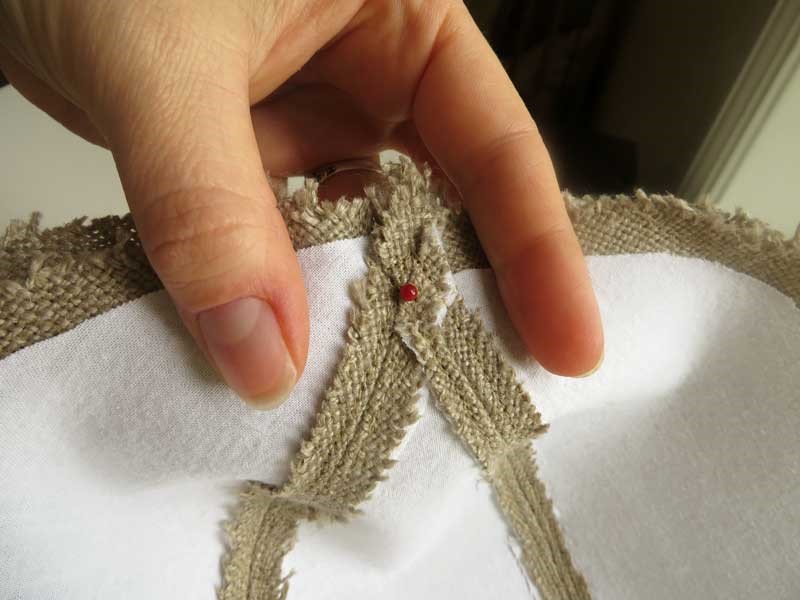
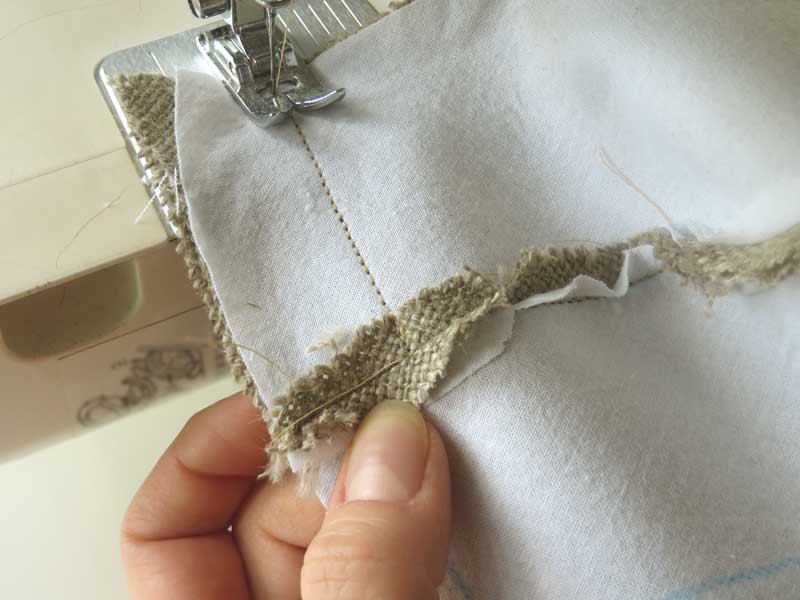
- Sew the front sides together from the center point outward along the curved borders.
- After you’ve sewed from the center point to one end of this seam, double-check that the center points are perfectly aligned and redo it if they aren’t.
- Double-check the measurement of the crown’s bottom border to ensure that your final seam is the correct size. Remember that the outer crown measurement should be about 1” larger than your intended hat size.
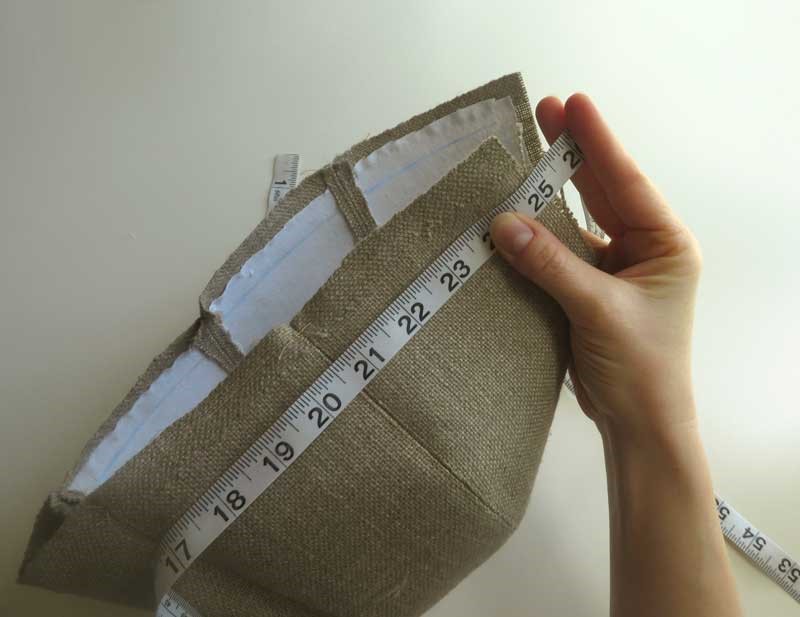
I’m making a size 23 hat so my outside measurement will be 24” and with two ½” seam allowances on the edges, it measures 25” from edge to edge. If any of my seams have been off up to this point, this is a great chance to correct the size by simply adjusting where this final seam is sewn.
- Sew the seam from the middle point to the other end.
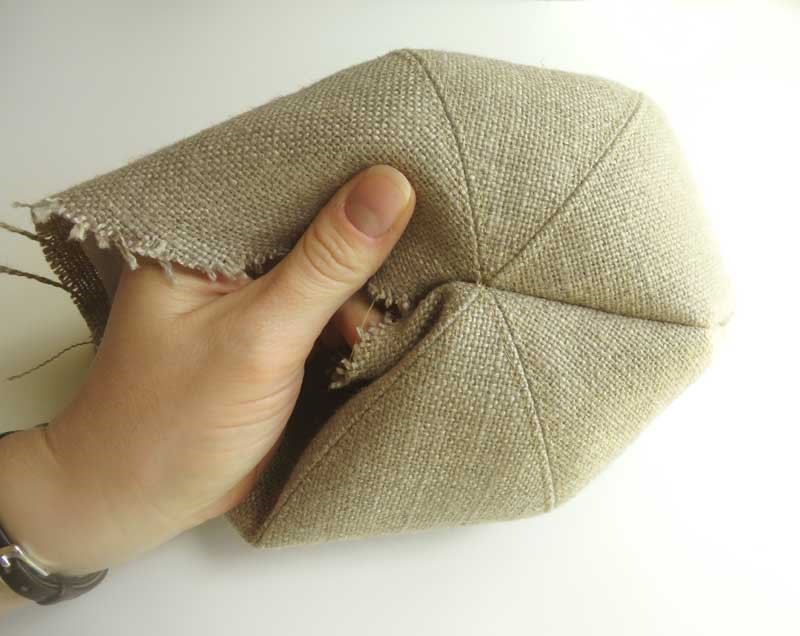
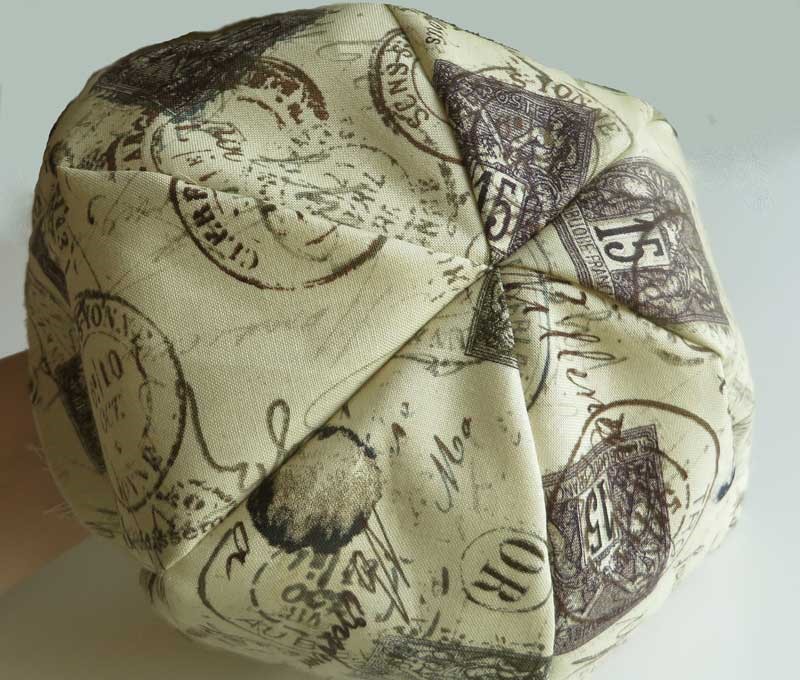
- You now have all six A pieces assembled.
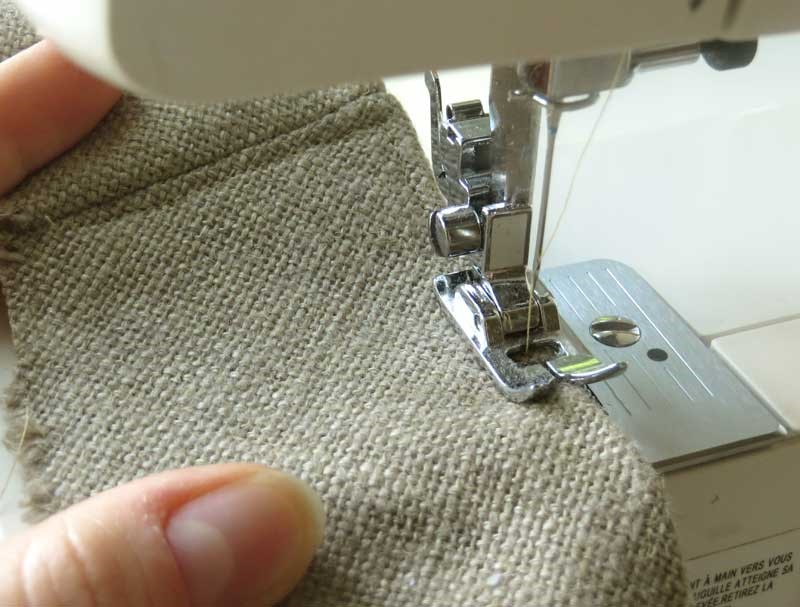
- With the crown inside out and back side facing up, sew a top-stitch 1/8” from the seam line of the final seam you completed (the one joining the two sets of three A pieces). Sew down the right side of the seam until you reach the end, then turn and sew down the other side.
- Cut off all the excess fabric from the seam allowance flaps once you’ve finished top-stitching.
- The outer crown is now complete.
Lining:
Cut out six pieces of lining using pattern A.
Follow steps 1-13 (no need to top-stitch the lining seams). Tip: If you’re worried about the lining not fitting perfectly inside the crown, make it somewhat larger than the crown rather than smaller.
- With your lining complete, insert the lining into the crown with back sides together.
- Make sure the lining is tucked as snug as possible into the crown. There may or may not be a bit of excess lining extending past the crown rim.
- Baste or sew the edge of the lining and the edge of the crown together, close to the edge of the fabric.
- If the lining is a little too large at the circumference, tuck the excess under in the final inch of your baste line.
- Cut off any excess lining that extends past the crown and set aside the lined crown.
Brim:
- Cut out two pieces of fabric using pattern B, making sure that the grain, texture or print of the fabric runs parallel, perpendicular or at a 45° angle to the center fold as desired.
- Pin the front sides together.
- Sew the outer edge of brim pieces together.
- Cut notches every 2” or so along the seam allowance on the outer edge of the brim. Cut right up to the intended sewing line but not beyond.
- Measure the intended sewing line on the inside edge of the brim, ½” in from the inside edge and ½” from the ends, to be sure it matches the outer measurement of the crown.
- Sew the front sides of the ends of the brim together, starting from the center line outward.
- Cut off excess fabric, leaving only about 1/4” of seam allowance on all loose flaps. I also like to cut a little notch at the center to get rid of some of the bulk.
- Turn right side out.
- Sew a top-stitch around the outer edge about 1/8” from the finished edge. You can begin this seam at either side of the joining seam (as shown) if you prefer.
- Baste the unfinished outer edge of the brim together, close to the edge. It can be hand-stitched or machine-stitched with a long stitch.
- Cut short notches in the unfinished edge of the brim, every 1-3” or so, to accommodate the curve of the fabric.
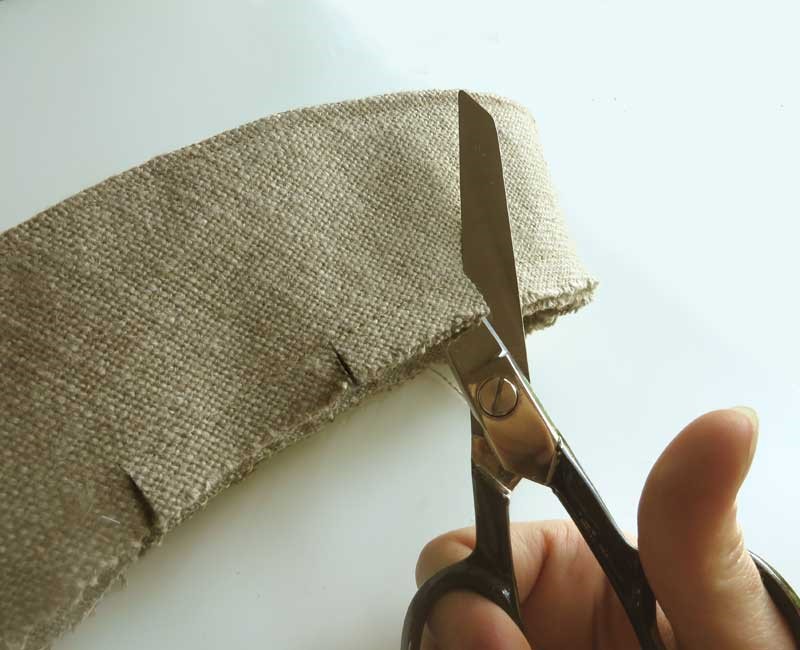
- The brim is now ready to attach to the crown.
Attaching the Brim:
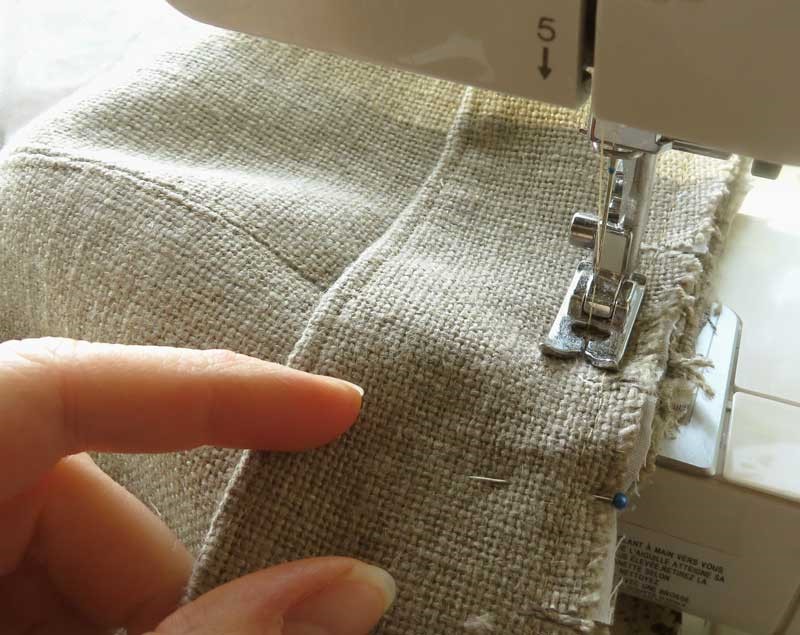
- Place the brim, inside out and upside down, around the crown, matching the back seam to one of the crown seams.
- Pin in place and sew together.
- Cut off the excess fabric from the seam allowance of the crown only.
- Tuck the flaps up into the hat.
- Stand back and admire. You’re coming close to having a completed hat.
Head Band:
For the head band, you can use the traditional grosgrain ribbon if you like but I find that it tends to pucker and prefer to use the hat fabric itself for sleek look.
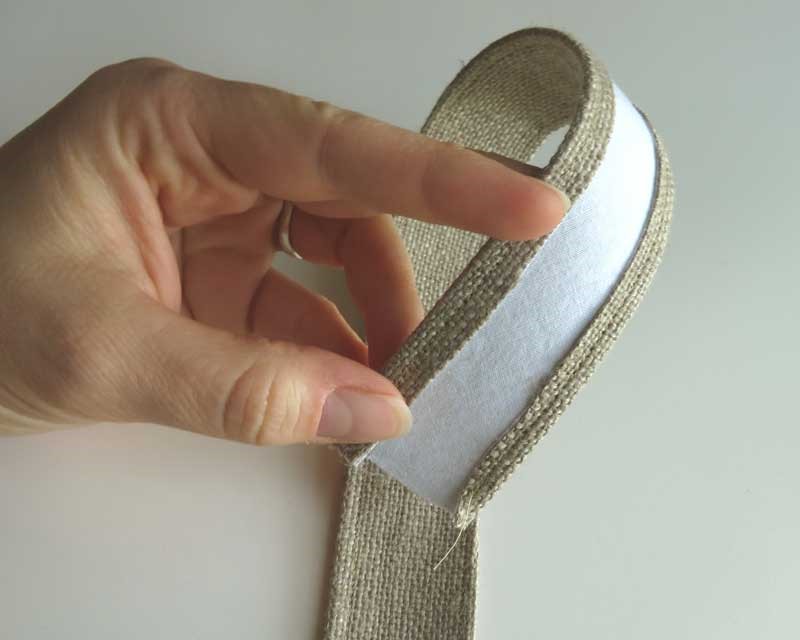
- Cut a piece of fabric 26” long and 2” wide. (Tip: See Page 5 of the PDF for more detailed instructions.)
- Fold a ½” fold over on both long sides of the piece and sew a top-stitch 1/8” from the edge.
- Turn the unfinished edges of the crown base up into the crown.
- Fit the head band into the crown beginning with an inch of head band before the seam line at the back of the hat.
- This gets a bit tricky but here goes… Place the hat over the arm of the sewing machine so that base of the crown is under the presser foot.
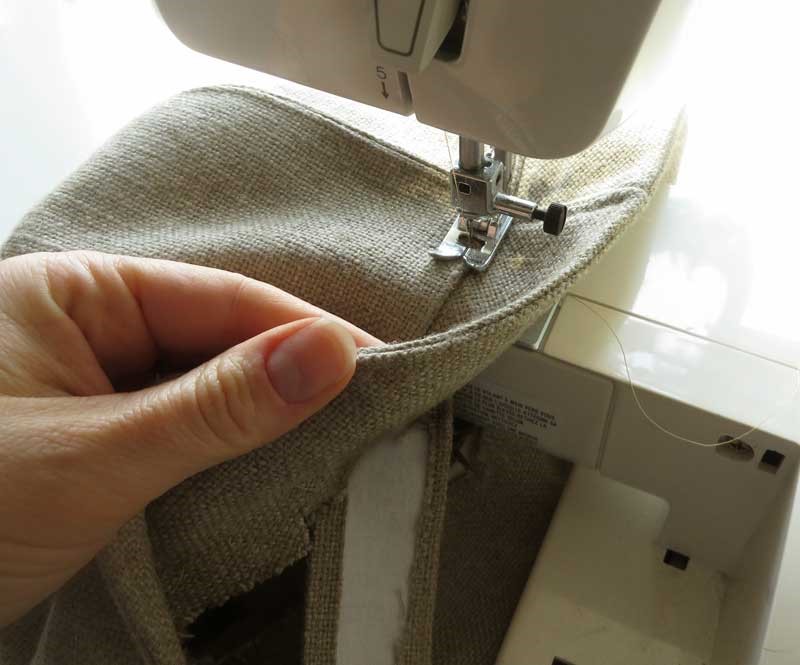
- The needle should plunge 1/8” to the left (toward the top of the crown) of the crown base seam. Begin at the back of the hat. With your right hand, feel under the brim to position the head band so that the edge of the head band is precisely lined up with the seam which joins the crown and brim.
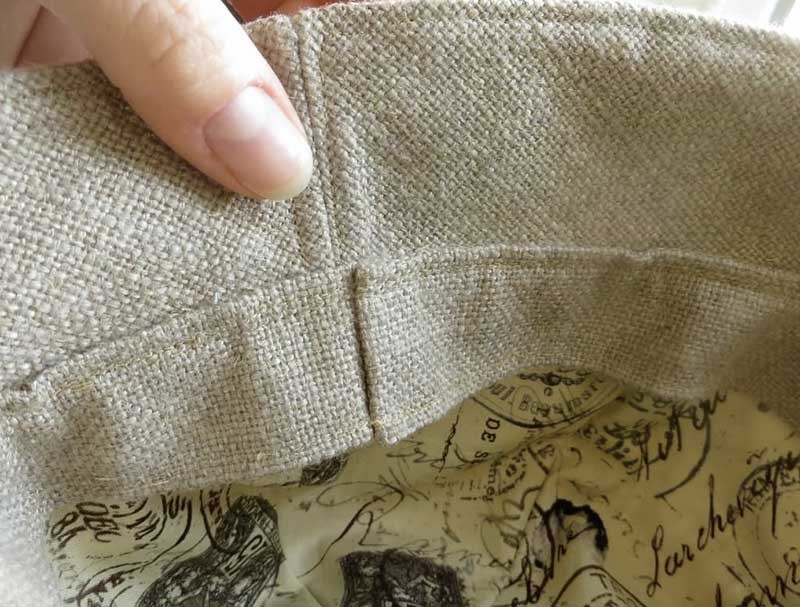
- Sew slowly and carefully around the crown base. Fold the extra headband under and finish the sewing line as you get closer to the back of the cap.
- Finish attaching the ends of the head band, by hand if necessary.
- The hat is structurally complete. Now you are ready to add trim.
Roses Trim:
You can decorate this simple cloche in whatever way you choose (ribbons, jewelry, buckles, buttons, etc.). This pattern features a brim flipped up over a simple band and handmade roses made of synthetic fabrics. You can also make these roses for hairpieces, boutonnieres, wedding bouquets or to trim other Elsewhen hat designs.
- Determine how many roses and buds you want to make.
- Cut petal shapes varying in size from about 1”-2” wide. You’ll need about ten petals for large full blooms and five petals for small buds.
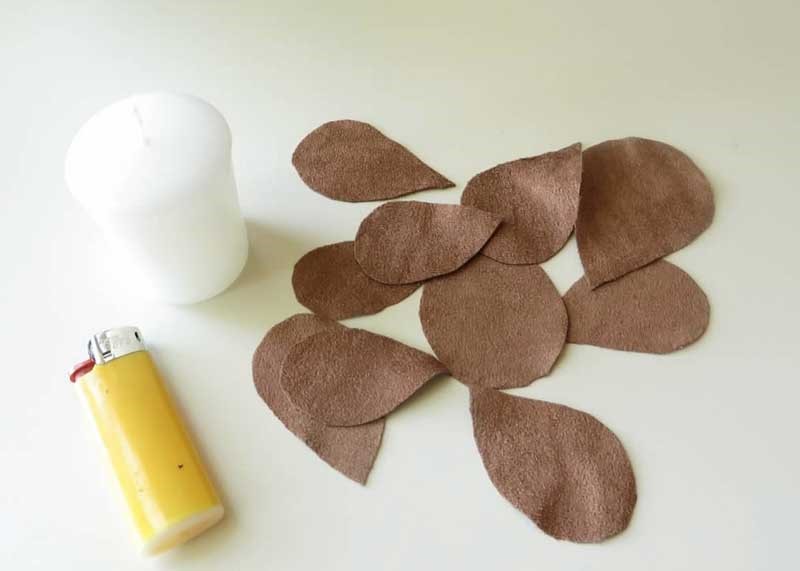
- In a well-ventilated area, use a candle or lighter to lightly singe the edges of each petal. This prevents fraying and somewhat melts the cloth, creating a curled, collected edge reminiscent of a real rose petal. Keep you fingers clear of the melting fabric.
- Depending on your fabric and fiber content, you may want to stiffen your petals by spraying them with fabric stiffener at this stage.
- When your petals are dry, begin to assemble your roses.
- Prepare a sewing needle with a 2’ length of sewing thread.
- Roll a small petal as shown and pass the sewing needle through the base a few times to secure the shape.

- Before you add the next petal, observe how real rose petals are arranged on a rose. Take note of how each following petal overlaps the one before it roughly halfway and continues in a regular path around the circle.
- Add the rest of the petals by crimping the base slightly and passing the needle and thread through each petal a few times.
- Add petals of increasing size, until your rose reaches your desired size.
- Cut off excess fabric at the base without cutting your thread.
- Assemble other roses and buds.
- Arrange them as desired on your hat and sew with on with invisible tack stitches.
Dear Rosabelle
Thanks for your generosity and sharing the how-to of hatmaking.
Best wishes / Ian
Just starting this hat. Sewing for 50+ years now and I’d like to comment on making users draw in cutting lines. Most of us aren’t perfect artists and expecting users to draw in cutting lines is a bit much to expect.
Etsy is selling your pattern for $10.00.
Thank you for the generous gift of a free hat pattern. The design is absolutely lovely. Things are really expensive, re: inflation, so finding this brightened my day. Looking forward to making this hat. I’ve always admired Wendy’s work.