Description
- Indygo Junction, Inc. IJ734
- One size fits most
Materials
- 3/4 yard of 44″-45″ fabric for apron
- 2/3 yard of 44″-45″ fabric for accent
- 7/8 yard of ric rac (I did not use the ric rac this time)
Overall Design
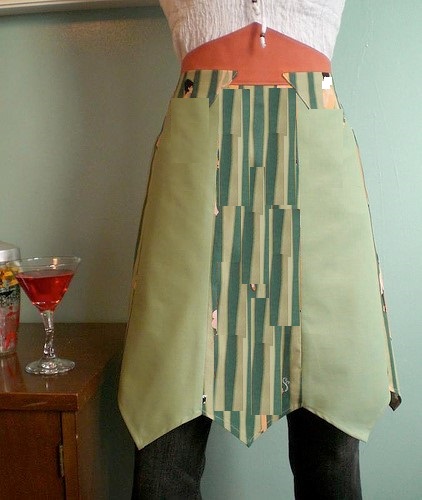
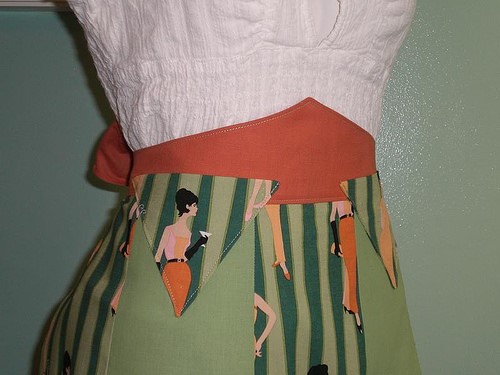
The over all design is great. I only gave it 4 starts because of the pockets. I just did not like the look of the finished pockets. They are too high and too small for my tastes. I have two young children and I am constantly picking up Legos, Magnetix and trash. I could not do my regular collection of household junk in this apron! I also think that if the pockets did not overlap the waistband the apron would look more polished.
It would create a nice slim waist. When I make this apron again I will reshape the pocket making it bigger and then I will drop it down into the main body of the apron. Another thing I would change would be the length. I feel it is a bit long for me. But if your tall this would be perfect. I am 5’4″ and it goes to mid knee on me. I will enjoy this one for myself in fact it is already dirty! I have chili splats all down the front of it. Opps! Although I would love to make this a Modern June apron soon!
Overall Functionality
Functionally, this apron is great. I also really like the sizing. As a size 12 I feel like I have plenty of coverage through the hips. I also love the length of the apron strings nice and long. They make a nice bow in the back. For those that have smaller waists you could wrap it to the front and tie it there. I love that look!
Written Instructions
Ok, so true confessions I never use commercial patterns and I now know why! SMS Sewing Tip #1! I need to read them out loud so I can understand them! Kristin thanks to you I now have patterns again. Indie patterns that is! I love that growing Indie-cottage industry thing.
The written instructions for this pattern we great! Flawless. When read out loud that is. : )
Pattern Pieces
I am glad that the pattern had “use salvage edge” printed on the pattern itself. I do not look at the lay out instruction very much. I would have done it the wrong way and would of needed to do a bit of extra sewing otherwise.
The pattern pieces we great up until the placement of the waistband. The waistband was about two inches larger than the apron. I just matched my centers and then cut off the extra on both ends. Despite this all the notches for the pockets were perfect.
Be sure to mind the dots on along the hem when sewing up the 5 main apron pieces. Stop at the dots and backstitch or you’ll be ripping them out a bit later and that would be a pain. You do this so you can turn up your hem later.
Overall Level of Difficulty
This is a great pattern for all sewers. Beginners might have a bit of trouble with attaching the waistband, though. I had to read that one over several time and I do waistbands all the time. Funny thing is that I almost do mine the exact same way. With the exception of attaching them both right sides together. I think it makes it look cleaner on the front.
I must say that my top stitching along the hem was a bit wonky! It is hard to turn 1/4 and the turn another 3/8 of an inch evenly. I would run a basting stitch for my 1st 1/4 turn to make sure that I am nice and even to start off. See photo tutorial below.
Tips for Hemming
When going back and making the fake hem for my tutorial, I remembered what I learned from the SMS Sewing Tip #2. I did not iron swooshing back and forth with steam I pressed and lifted and that made of a much better hem. Not wonky at all!

On the 1/4 inch mark do a basting stitch
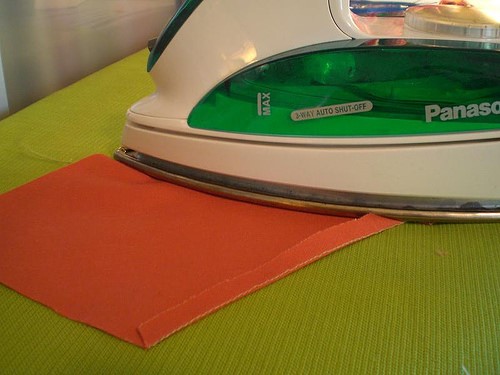
Turn hem on the stitch line and press with dry iron! Remember to lift it up and down, but not move the iron back and forth.
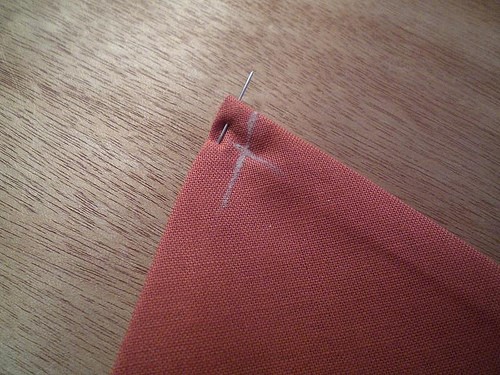
Turn another 3/8 of an inch and PRESS. Then mark your magic X one 1/4 inch so you know right when to turn. When doing this on a hem I will not use the tailors chalk because it did not go away easily enough. I love my new fine point water erasable fabric-marking pen, I am guessing it is a Dritz product.
Remember to place you machine so the needle remains in the fabric when you stop sewing.
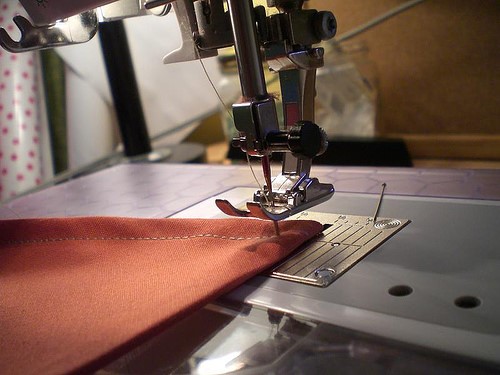
Check out that top stitching! I used to avoid this technique like the plague. Oh the best thing to do for yourself is to take you time just go as slow as you can stand. I love learning how to do this whole sewing thing just a bit better every time I sew.
Modifications
Ok so take this with a grain of salt. I am “The Modifier”!!! I really like making it my own. You know what I mean? I did do this pattern exactly as it was supposed to be. But I took a lot of notes on what “my” version would be.
- Like I said earlier I would change the pockets. They would be bigger and lower.
- I would not do the peak on the waistband. When I wore it became all crumpled. If you like the look I suggest you add some lightweight interfacing.
- I would check the pattern to see if the waistband really needed to be smaller.
- I would make the apron about 2-3 inches shorter.
Fabric Suggestions
New cotton, recycled tablecloths, washable upholstery weight fabric