You might be familiar with pearl prong snaps if you’ve ever seen a fancy western shirt or rodeo shirt. That’s where I first ran into them- when I was a teenage thrift store shopper, a western shirt was considered one of the best finds. I loved them! And still do.

The best part of a western shirt, as far as I was concerned were the wonderful pearl snaps. I loved the extra fanciness they gave an otherwise ordinary plaid, and I loved the satisfying snap they made when I clicked them together.
Pearl Prong Western Snaps Tutorial
Pearl snaps aren’t just the best part of western shirts though- you can buy them as supplies and use them on all kinds of sewing projects. And pearl snaps aren’t just for western wear, either. They can be used almost any place you might otherwise use a button. Eristotle, for example, uses them on her Tiny Pocket wallets.
Faitavec uses them on her fabulous spats. They’re a great accompaniment to sparkle vinyl creations. I’ve seen them used on skirts, belts, leg warmers, curtains and towels. My brand of snaps- Cowgirl Snaps- are lead free, and can be used on bibs, onesies and other children’s clothes items. They also look great when used non-functionally, as a purely decorative accent.
I like to use the wide variety of colors available to create contrasts, or to draw out colors from the fabrics. In the tutorial that follows, I used Marigold Cowgirl Snaps and a marigold colored back fabric on the Linda Mae Pillowcase.
In the finished pillowcase, the yellow of the Cowgirl Snaps nicely draws out the yellow background that edges the pillowcase, and contrasts nicely with the purple flowered fabric on the front. My other current favorite colors are Teal, Red and Chartreuse.
And besides being fabulous, pearl snaps are also great for those who have a disability or illness that makes the delicate work of undoing buttons difficult.
I took the buttons off of one of my Grandpa’s favorite shirts and put Cowgirl Snaps on it, and he liked the shirt even better than before.
Using and setting pearl snaps is easy, once you get the hang of it, but there are a few things that will help make it easier to do, and a few “best practices” that will make for a high quality, durable and beautiful finished project.
What are Pearl Snaps and how do they work?
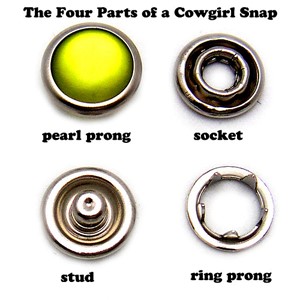
Pearl snaps, also known as no-sew snaps, western snaps, and pearl prong snaps, are a closure device often associated with western wear. They have a stud side which fits neatly into the socket side, creating a firm closure for any opening. They have four parts- a pearl prong, ring prong, socket and stud.
The pearl prong and ring prong pieces have prongs on the end that pierce fabric when pressure is applied. The prongs then fold into a ring indentation on the back of the socket or stud. The pearl prong goes with the socket, the ring prong with the stud. To use them, you need a snap setting tool.
Recommended Fabric
- Woven fabrics such as quilters cotton, canvass duck, etc.
- Light weight vinyl
- Polar fleece
- Etc.! (not recommended for knits)
Types of Tools to Use to Set the Snaps
I recommend using the Dritz Snap Pliers. There are also hammer-on kits available, but these must be used very carefully, as it is easy to crack the pearl side. If you will be using snaps a lot, consider an industrial snap press. They can cost as much as $200, but are above all the easiest to use. If you’re just getting started though, the pliers are the way to go- below are some instructions and tips that will help you use the pliers correctly.
Where can I buy pearl snaps?
You can buy pearl snaps in 24 color from Etsy. They are also available at fabric stores, though the color selection is often more limited. I also sell the Dritz snap pliers. And don’t forget to enter the contest to win 48 Cowgirl Snaps of your choice and a set of Dritz Pliers.
Before you set the snaps:
Fabric Preparation
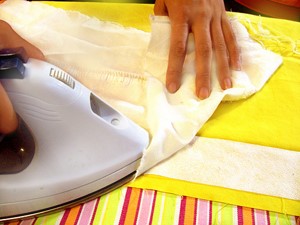
As a rule of thumb, use 2 layers of fabric with one layer of woven interfacing sandwiched between. This will provide the structural strength needed to resist the pressure of putting together and pulling apart your snap. This extra support will ensure that the snaps don’t rip through your garment and make yucky holes.
Just make sure the interfacing is appropriate to the weight of fabric you’re using, and isn’t visible in the finished piece. In the pillow how-to below, we fold the edges of the pillow over a light weight interfacing.
You can experiment with fabric types; if you are using a heavy weight fabric such as cotton duck, you may need only two layers of fabric. To test, set the snaps on a scrap piece of fabric, and snap the snaps on and pull them off about 20 times. If the snap starts to pull away from the fabric, your fabric is not strong enough, and you should apply interfacing. If you are using a medium to heavy weight vinyl, one layer is usually sufficient.
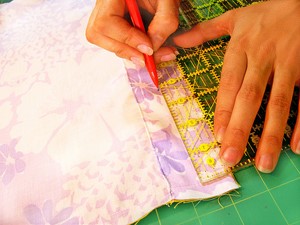
Marking
Before setting your snap, mark where you want it to go on your project with a washable fabric marker or chalk.
Be sure to mark in two places- one for the pearl/socket side and one for the ring prong/stud side.
Practice makes perfect!
If this is the first time you’ve used the Dritz Snap Pliers or pearl snaps, always practice first on a scrap piece of fabric. All Cowgirl Snap orders come with a few extra sets so you can try a few out first if you need to. A word to the wise: getting the hang of the Dritz Pliers does take time. Expect to make a few mistakes at first.
How to set the Snaps:
Setting up the Snap Pliers
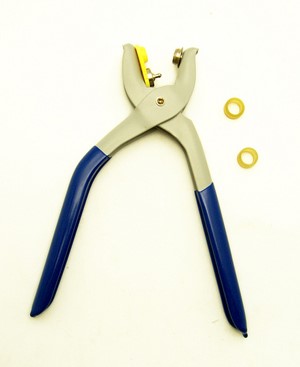
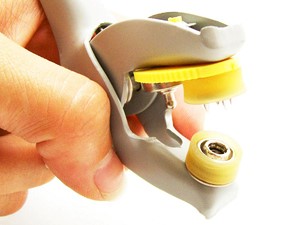
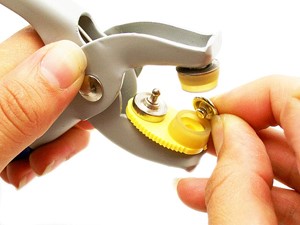
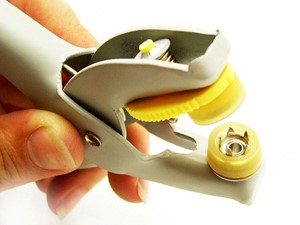
The Dritz Snap Pliers come with three essential parts- the pliers themselves, and two rubber rings. The rubber rings hold your snaps in place before you put them onto the fabric. When you get your pliers, make sure that the yellow plastic side with the round hole in the middle is on the outside. If it’s not, you can push the yellow oval up and twist it around. The metal stud side is not used when setting Cowgirl Snaps. Fit the rubber rings onto the metal side and the yellow side of the pliers. Make sure they are firmly in place.
Setting the Pearl Prong/Socket Side
- The pearl prong goes into the yellow side of the pliers, with the prongs facing out. To get it in place, stretch the rubber rings apart a little bit and slide the pearl prong inside.
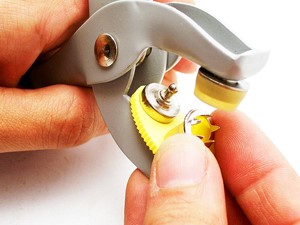
Make sure it is FIRMLY in place, held snugly and securely by the rubber ring.
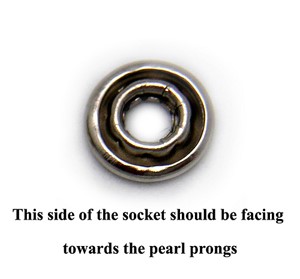
The socket piece: There is an inside and an outside of the socket piece. The inside of the socket is the side that the prongs will go into and latch onto. This side has a larger circumference indentation around the center. Check out this pic… It’s much easier to show this than it is to describe it!
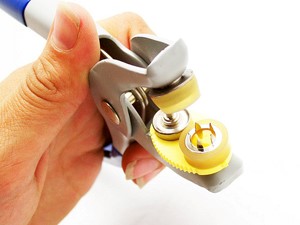
The socket goes into the metal side of the pliers…
With the inside facing towards the pearl prongs.
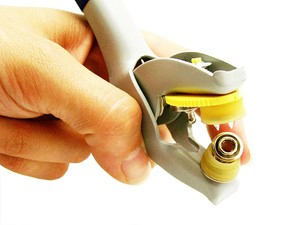
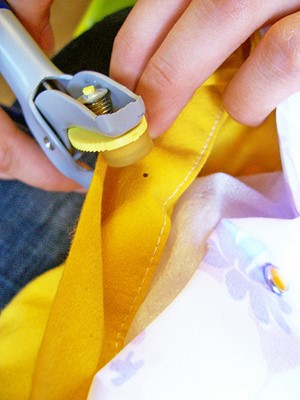
Setting the snap: Once you have the two pieces in place, put the fabric you wish to snap in the jaws of the pliers.
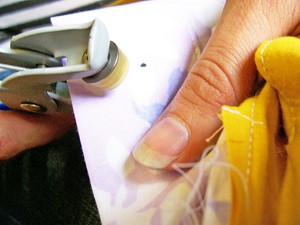
Line the snaps up over the mark you have made, so that the pearl side is on the outside of your item, and the socket side is inside. Squeeze gently but firmly. You’re done!
Setting the Ring Prong/Stud Side
- The ring prong goes into the metal side of the pliers
With the prongs facing out.

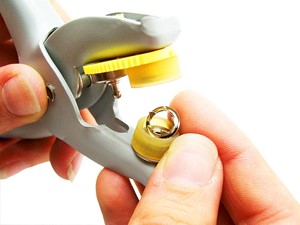
- The stud piece goes into the yellow side of the pliers, with the stud facing into the pliers.
Peel the rubber rings apart, and place the stud piece into the yellow side. The stud should make a click sound as it fits into the hole in the pliers.
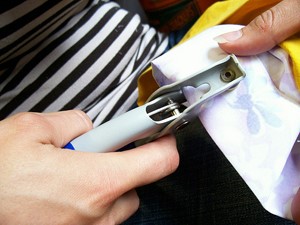
- Setting the snap: Once you have the two pieces in place, put the fabric you wish to set the snap on in the jaws of the pliers. Line the snaps up over the mark you have made, so that the ring prong side is on the outside of your item, and the stud side is inside. Squeeze gently but firmly. You’re done!
Snap Setting Tips:
Be sure that the snaps are completely inside of the rubber rings on the pliers. Also, try getting the pliers as close together as you can, without piercing your fabric, before you give the final snap setting squeeze.
Quality Control:
Both sides of the snap should be firmly attached to the fabric. If you can fit a finger nail between the bottom of any of the four parts of the snap and the fabric, you need to squeeze it a little more. Fit the snap pieces back into the pliers, and give them another gentle squeeze.
Trouble Shooting:
The prongs didn’t line up with the socket/stud when I set the snap!
This happens. Even to the best of us. It can be frustrating! But I have found a few tricks during my snapping years:
- • Check to make sure that both sides of the snap are firmly tucked into the rubber rings on the pliers.
- • I also find it helps to slowly squeeze the pliers together, until the prongs are almost touching the fabric. When they are this close, I then give the pliers the final firm squeeze that sets the snap.
- • And for some reason, I find they work best when you keep the pearl prong or ring prong side on the bottom.
I put the snap in the wrong place. How do I get the snap off of the fabric?
The most effective way to get them off is to take a flat head screw driver and insert it under the socket/stud side and pry the snap off. It can be a pain to do- but at least it can be done, and if done carefully, it won’t mess up your fabric. You can reuse the socket/stud sides if they are undamaged. I don’t recommend reusing the ring/pearl side, however, as there is usually a bent prong.
The Pearl part cracked!
Oh no! This is probably because too much pressure was applied during snap setting. Try using less pressure next time. A firm but gentle squeeze is the best.
There’s a little round flap of fabric sticking up out of the middle of the ring prong side. It seems like it’s cut.
Again, this could be the result of too much pressure during snap setting. Try using less pressure next time. This could also be the result of insufficiently strong interfacing. Try using another layer of fabric or a heavier weight interfacing.
There’s a big gap between one side of the snap and the fabric.
This is probably the result of not enough pressure during snap setting. It’s easy to fix, though! Fit the snaps back into the snap pliers and give it another gentle squeeze.
Project Ideas for Pearl Snaps:

- • Make an envelope wallet and close it with a snap!
- • Use as fastenings for the openings of arm warmers or leg warmers.
- • Instantly turn a plaid into a western shirt by removing the buttons and adding pearl snaps in their place.
- • Spice up a wool jacket by adding just the pearl/socket side of a snap to the sleeves and hem.
- • Make a reusable sandwich bag and close it with a snap!
- • Use with vinyl to make lapel pins and barrettes.
- • There’s so much more!
i loved reading this. back in my sewing days, i made Western shirts and used these snaps! in those days, we just used a small hammer to ‘set’ the snaps. it was a long time ago! would love to sew clothes again and use these snaps and those handy plier things!
so glad to find you again. i went MIA during the covid lockdowns etc and stopped everything. i used to read your blog all the time and it was one of my very favorites!