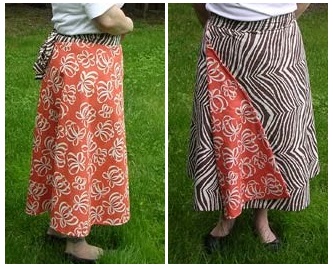
First, I have to thank Bethany for the excellent wrap skirt tutorials–pattern drafting and construction. I whipped it up the other night, with great results. I love it and got oodles of compliments on it. Ten reasons you should try this:
- Custom fit the way you like it. Fit it to your hips or your waist, make it long or short.
- 2 skirts in one!
- No hemming. I didn’t really catch that part until I was making it. You get a full skirt and you don’t have to hem it! The 2 layers are sewn together at the bottom.
- No lining. The double-sided construction means you don’t have to fiddle with a lining or an underskirt.
- No zipper. Now Michelle has made the whole zipper thing seem pretty easy, but still, I know some of you are jittery.
- It’s flattering. There are no gathers around your waist, so it lies pretty flat.
- Wrap skirts are timeless.
- You can wear this skirt on your fat days or your skinny days. That’s one of the beauties of the whole wrap thing;-)
- It can be informal or dressy. I wore my cotton skirt with a t-shirt yesterday, but I could make this skirt again in silk or velvet for a wedding or the holidays.
- It’s quick. I made the pattern and finished the skirt in about 3 hours.
Now, after speaking to Bethany, we changed the fabric recommendations. This sounds suspicious, I know, coming from a fabric store owner, but I promise, you need more than 2.5 yards of fabric if you are using 44″ quilting cotton. If you are using 60″ fabric, you’ll be fine with 2.5 yards. If you’re using a sheet, you’ll be good. If your bottom skirt width is less than 22″, you are ok. But, here’s how to calculate your yardage if you are using 44″-wide cotton and your bottom skirt width is more than 22″.
- Determine your bottom skirt width. This is from Bethany’s pattern drafting instructions.
- Multiply by 4.
- Divide by 36.
- Add a few inches to be safe.
For an example, I’m about 5’7″ and a size 14. I wanted a true-waist skirt about mid-calf. I used my 5th grade math skills and figured out my skirt dimensions (again, using Bethany’s instructions): Waist–11″, Length–30″, Width–30″.

So, to figure out the yardage, I use the width.
- 30
- 30 x 4 = 120
- 120/36 = 3.33
- I rounded it up to 3.5. This is how much yardage I needed per side.
The reason you need this much is because the 30″ -wide pattern piece needs to be placed on the fold. Folded quilter’s cotton is only 22″. You need 2 pieces that are at least 30″ wide folded (60″ unfolded.) To get ready to cut your pattern:
- Wash, dry and iron your fabrics.
- Cut your yardage in half. If you had 3.5 yards like I did, cut it so you have 2 pieces that are 1.75 yards each (x 44″.)
- Fold those in half. Not selvage to selvage, like it comes, but fold each selvage edge over on itself, like this:
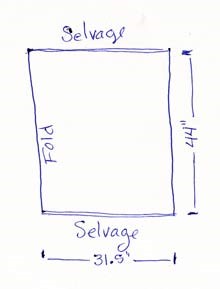
(Forgive my sloppy drawing. That should be a straight line on the folded side.)
You have to cut 4 in this way–2 for each side of the skirt.
Finally, I’m going to show you a photo of my backside, which I normally wouldn’t do, but it is to demonstrate a point.
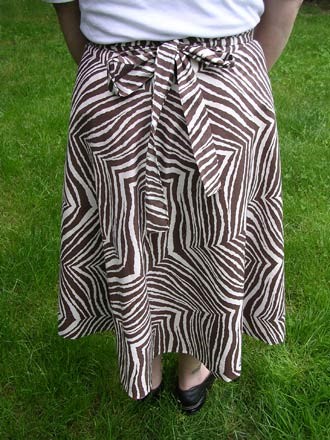
I’ve been madly in love with this fabric since it came in, so I wasn’t really thinking when I picked it to use for the wrap skirt. First, I have stripes on my butt, which are never a good thing if you have much of a butt. Secondly, it was a real trick to match up the stripes at the seam in the back. I did it, but I wouldn’t recommend it. You can also kind of see in the top picture that the stripes are angling down on the front of the skirt because of the slope of the pattern piece. Just a reminder to really think about the prints you choose for this skirt. I would stick with a non-directional scatter design. Large or small scale would work.
Now, go sew!